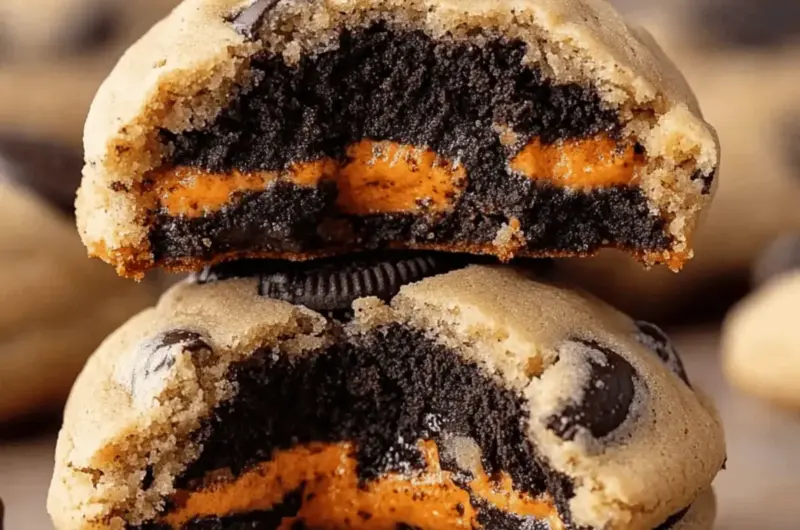
As the leaves turn vibrant hues and the air gets a crisp bite, I can’t help but feel the excitement of the Halloween season creeping in. It was during one of those cozy evenings, with my kitchen bathed in warm light, that I decided to whip up something special to celebrate. Enter these Halloween Oreo Stuffed Chocolate Chip Cookies—a treat that perfectly combines the comforting, gooey delight of chocolate chip cookies with a fun, festive surprise.
Imagine cracking into one of these magnificent cookies, revealing a hidden treasure of creamy Oreo nestled in soft, chewy dough, sprinkled with colorful Halloween confetti. Quick and easy to prepare, they are the ideal solution for those last-minute gatherings or simply to indulge your own sweet tooth. Whether you’re looking to impress guests or just treat yourself, these cookies offer a deliciously creative twist on a classic. Ready to make magic in your kitchen? Let’s dive into this delightful recipe!
Why are Oreo Stuffed Cookies a must-try?
Delightful Taste: These Oreo stuffed cookies bring the joy of Halloween into every bite, combining warm chocolate and a surprise creamy filling.
Quick & Easy: With minimal effort, you’ll whip up a batch that impresses, making them perfect for busy schedules.
Festive Fun: Colorful sprinkles and Halloween Oreos make these a visual treat, ideal for gatherings or as a special snack.
Endless Variations: Feel free to swap out Oreos for seasonal favorites to create your unique twist!
Crowd-Pleasing: Everyone loves cookies, and these are sure to become a favorite at any celebration, leaving guests craving more!
Oreo Stuffed Chocolate Chip Cookies Ingredients
-
For the Batter
-
Butter (1/2 cup) – Provides richness and moisture; can use softened coconut oil for a dairy-free version.
-
Brown Sugar (1/2 cup) – Adds sweetness and contributes to chewiness; substitute with coconut sugar for a lower glycemic option.
-
Granulated Sugar (1/3 cup) – Enhances sweetness and balances flavor; you can use all brown sugar if desired.
-
Egg (1 large) – Binds the ingredients and adds moisture; replace with 1/4 cup unsweetened applesauce for a vegan option.
-
Vanilla Extract (1 tsp) – Provides depth of flavor; omit for an ethanol-free version.
-
Flour (1 and 3/4 cups) – Forms the cookie structure; can use a gluten-free flour mix for gluten-free cookies.
-
Cornstarch (3 tbsp) – Helps achieve a soft, chewy texture; can be omitted if unavailable, but results may vary.
-
Baking Soda (1/2 tsp) – A leavening agent that helps cookies rise; no substitutions recommended.
-
Salt (1/4 tsp) – Balances sweetness and enhances flavors; essential for flavor development.
-
For the Filling & Topping
-
Semi-Sweet Chocolate Chips (2/3 cup + more for topping) – Adds rich chocolate flavor; use milk or dark chocolate chips based on preference.
-
Halloween Oreos (9 cookies) – The fun surprise element inside; can substitute with regular Oreos for a less festive look.
-
Halloween Sprinkles (1/4 cup) – Adds color and festive flair; substitute with any colorful sprinkles or omit if desired.
How to Make Halloween Oreo Stuffed Chocolate Chip Cookies
-
Preheat Oven: Start by preheating your oven to 350°F (175°C). While that’s heating, line a baking sheet with parchment paper or a silicone mat to prevent sticking.
-
Cream Butter and Sugars: In a medium bowl, combine the softened butter, brown sugar, and granulated sugar. Cream these together until the mixture is smooth and fluffy, creating a lovely base for your cookies.
-
Combine Wet Ingredients: Add one large egg and one teaspoon of vanilla extract to your butter-sugar mixture. Mix well until everything is beautifully blended together, ensuring a cohesive dough.
-
Incorporate Dry Ingredients: Gradually add in the flour, cornstarch, baking soda, and salt. Stir gently until just combined, being careful not to overmix—this keeps your cookies tender and soft!
-
Add Chocolate Chips and Sprinkles: Fold in your semi-sweet chocolate chips and half of the Halloween sprinkles, ensuring each bite will have a delightful mix of chocolatey goodness and festive flair.
-
Form Cookies: Using a scoop, portion out your dough. Flatten each scoop slightly and place an Oreo in the center, then wrap the dough around it and seal any edges to protect the cookie treasure inside.
-
Bake: Arrange the formed cookies on your prepared baking sheet and bake in the preheated oven for about 10 minutes. They should look slightly underdone, which is perfect for a gooey center!
-
Cool: Remove the cookies from the oven and immediately top each one with a few extra chocolate chips. Let them cool on the baking sheet for 5 minutes before transferring to a wire rack to cool completely.
Optional: Sprinkle additional Halloween sprinkles on top while they’re still warm for a festive finish.
Exact quantities are listed in the recipe card below.
Expert Tips for Halloween Oreo Stuffed Cookies
- Avoid Overmixing: Mixing too much can lead to tough cookies. Stir until ingredients are just combined for a soft texture in your Oreo stuffed cookies.
- Seal Well: Ensure that the dough fully encases the Oreo to prevent leakage during baking; an unsealed cookie can result in a messy surprise.
- Chill for Thickness: For thicker cookies, chill the dough for 30 minutes before baking. This step enhances the Oreo stuffed cookies’ texture and helps maintain shape.
- Monitor Baking Time: Keep a close eye on your cookies; they should look lightly golden but still soft in the center. Slightly underbaking is key to achieving that gooey interior!
- Extra Toppings: Feel free to sprinkle more chocolate chips or festive sprinkles on top right after baking to add extra flair and taste.
What to Serve with Halloween Oreo Stuffed Chocolate Chip Cookies?
Create an enchanting feast that complements the warm, gooey magic of these festive treats!
- Cold Milk: The classic pairing enhances the rich chocolate flavor, creating a nostalgic experience that everyone loves.
- Pumpkin Spice Latte: The warm spices of this seasonal favorite beautifully contrast with the sweet Oreos, adding a cozy autumn vibe.
- Vanilla Ice Cream: A scoop alongside your warm cookies creates a delightful temperature contrast, perfect for an indulgent treat.
- Spiced Apple Cider: Its warm, spiced notes elevate the Halloween spirit, making it a perfect drink for festive gatherings.
- Chocolate Dipped Fruit: Fresh berries dipped in chocolate provide a refreshing balance to the richness of the cookies— a lively burst of flavor!
- Ghost-Shaped Marshmallows: Add playful notes to your spread, making your dessert table visually captivating and fun for all ages.
- Caramel Sauce: Drizzling warm caramel over the cookies takes the pleasure up a notch, creating a heavenly experience with every bite!
Storage Tips for Halloween Oreo Stuffed Chocolate Chip Cookies
- Room Temperature: Store cookies in an airtight container for up to 4 days at room temperature to maintain their soft, chewy texture.
- Fridge: If you prefer a longer shelf life, refrigerate the cookies in a sealed container for up to 1 week. This keeps them fresh and delicious.
- Freezer: For extended storage, freeze the cookies for up to 3 months. Wrap them individually or stack with parchment paper in between for easy thawing.
- Reheating: When ready to enjoy, thaw at room temperature and warm in the microwave for about 10-15 seconds for a freshly baked taste of your Halloween Oreo stuffed cookies!
Make Ahead Options
These Halloween Oreo Stuffed Chocolate Chip Cookies are perfect for meal prep, allowing you to enjoy festive treats without all the last-minute fuss! You can prepare the cookie dough up to 24 hours in advance by following the initial steps and then refrigerating it in an airtight container. This helps to maintain the dough’s freshness and texture, ensuring they turn out just as delicious. When you’re ready to bake, simply scoop, wrap around the Oreos, and pop them in the preheated oven. Alternatively, you can also bake the cookies, allow them to cool, and store them in an airtight container for up to 4 days. Just remember to reheat briefly in the oven for that fresh-out-of-the-oven taste when serving!
Oreo Stuffed Cookies Variations
Ready to make these Halloween Oreo stuffed cookies your own? Let your creativity shine with these delightful twists!
- Dairy-Free: Substitute butter with softened coconut oil for a delicious treat that everyone can enjoy.
- Nutty Surprise: Add 1/2 cup of chopped walnuts or pecans for a delightful crunch that contrasts beautifully with the chewy cookie.
- Spooky Spice: Mix in 1 teaspoon of cinnamon or pumpkin pie spice for a cozy, autumnal flavor that dances on your palate.
- Gluten-Free: Use a gluten-free flour blend to make these cookies suitable for gluten-sensitive friends, ensuring everyone can enjoy the fun!
- Chocolate Overload: Swap in dark chocolate chips for an intensified chocolate experience that will make any chocoholic swoon.
- Minty Fresh: Use Mint Oreos instead of regular ones for a refreshing twist that adds a cool burst of flavor to each bite.
- Caramel Drizzle: Drizzle melted caramel sauce on top of the baked cookies for an indulgent touch. The sweet and salty combination is irresistible!
- Sprinkle Sensation: Swap out the Halloween sprinkles for chocolate or rainbow sprinkles, bringing a fun and colorful flair to your cookies for any occasion.
Mix and match these ideas to create your perfect Halloween treat that will enchant friends and family alike!
Halloween Oreo Stuffed Chocolate Chip Cookies Recipe FAQs
What are the best Oreos to use for Halloween Oreo Stuffed Cookies?
Absolutely! For an authentic Halloween twist, I recommend using Halloween-themed Oreos, as they add festive flair with their colorful cream filling. However, you can also substitute with regular Oreos if you can’t find the themed ones; they’ll taste just as delightful!
How should I store Halloween Oreo Stuffed Cookies?
To keep your cookies fresh, store them in an airtight container for up to 4 days at room temperature. If you’re hoping for a longer shelf life, just pop them in the fridge, where they’ll last about a week. If you want to freeze them, wrap each cookie tightly or stack them with parchment paper in between for up to 3 months.
Can I freeze Halloween Oreo Stuffed Cookies?
Absolutely! After baking, let your cookies cool completely, then wrap each one individually in plastic wrap or place them in a freezer-safe bag. Lay flat in the freezer for up to 3 months. To enjoy, simply thaw at room temperature, and for a warm treat, microwave them for about 10-15 seconds.
Why are my Halloween Oreo Stuffed Cookies spreading too much?
This is a common concern! Make sure to chill your dough for at least 30 minutes before baking, as it helps to firm up the fats. Additionally, be cautious not to overmix the dough, which can create a tough texture and affect how they spread. If they’re still spreading, you may want to check that you’re using the correct amounts of flour and butter.
Can I make these cookies gluten-free?
Very much so! Simply swap out the all-purpose flour for a gluten-free flour blend. Just be mindful that the texture may differ slightly, but they’ll still be delicious!
Are there any allergens I should be aware of for pets?
It’s important to note that chocolate is toxic to dogs and other pets. Keep your Halloween Oreo Stuffed Cookies out of reach and always opt for pet-safe treats to ensure your furry friends stay happy and healthy!

Oreo Stuffed Chocolate Chip Cookies for a Spooktacular Treat
Ingredients
Equipment
Method
- Preheat your oven to 350°F (175°C). Line a baking sheet with parchment paper or a silicone mat.
- In a medium bowl, cream together softened butter, brown sugar, and granulated sugar.
- Add one large egg and one teaspoon of vanilla extract to the butter-sugar mixture and mix well.
- Gradually mix in flour, cornstarch, baking soda, and salt until just combined.
- Fold in semi-sweet chocolate chips and half of the Halloween sprinkles.
- Using a scoop, form dough, flatten it slightly, place an Oreo in the center, and wrap the dough around it.
- Arrange cookies on the baking sheet and bake for about 10 minutes.
- Let cool on the baking sheet for 5 minutes before transferring to a wire rack.

